Face Mask Saga
by Evelynne Merrymet
By the time you read this I will have made over 125 face masks in the last few weeks. I am now working on version 6.0 and counting. Keep those suggestions coming folks. A non-profit I work with, the School of Living. asked me to write up how I make the masks for their newsletter. As long as I have it I will share it with the barony and my clan. There are lots of how-tos out there but I guess the more the merrier.
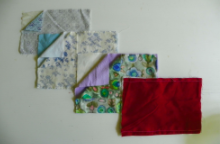
Materials for one mask
cloth two pieces 7″X10″
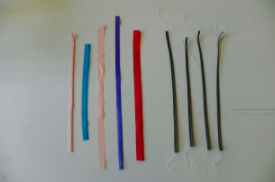
ties 4 – 10″ each
thread
Optional:
Blue shop towels by Scott or other filter material. One piece 7″X10″ for filter
18 gauge craft wire 4″
Tools:
sewing machine or large eye needle
pins (short)
thread
Optional:
3 needle nose pliers
one round tip
two flat not serrated
1 small wire clipper
I am not making one mask. I am making over 100 masks a dozen at a time. I need lots of fabric and stuff. Luckily I inherited all the family flotsam by way of craft supplies and I got 5 truck loads of the stuff when Mama died. My Grandmother was a seamstress, and she raised children in the depression so I have all her scraps. Anybody want to make a quilt or ten? I wondered what I would do with the box of old worn and torn sheets saved for the fabric. Now I know. I am told the best material is pillowcases and tee shirts. Pillow cases and sheets are the same stuff. Filters and nose wires are optional. I am voting for the nose wires, they help keep the air coming through the mask instead of around it. I am undecided on the filters. The Scott brand shop towels are said to be good filters. They are mostly paper but they seem to hold up to washing ok. They are thick and I find it harder to breath with the filter. I also suspect I am sucking air from the gaps at the edge of the mask since the center is hard to breath through. I am also using a thinner similar filter also mostly paper, using some plastic fiber for strength. It also held up well in the wash and it is more breathable. The white filter is “Intex cloth like rags from Walmart.” I paid $10 for a box of 300. Most of the home made masks I see do not have either filters or nose wires and they look and seem fine to me.
My first sources for a pattern said cut 6″x9″. If I make 1⁄2 inch seams that makes finished 5″x8″; I find that small and make that size for kids. 7″x10″ makes 6″x9″ finished which goes over the chin and accommodates beards. I find it more comfortable. The first source had me make two pleats on the sides. I can make three pleats even with the smaller masks, so it draws in better on the side than two pleats. My best masks have a flannel inside for comfort and a summer weight cotton in colors and patterns on the outside.
The ties I prefer are bias tape sewn lengthwise to prevent fuzzing in the wash. I have a shoe box of bias tape packages and I have lots of color so I get variety in my product. I am cutting 10 inch pieces, 12 inches is too long hanging behind the ear, 9 inches is ok but less than 9 and fumble fingers may have trouble tying the strings. I have also used ribbon but remember to tie a knot in one end to stop fraying in the wash. One ribbon tore in the wash but mine are very old. Elastic does not work for me. It irritates the ear with repeated or lengthy use and one size does not fit all. The ties adjust to the size of the face. Loosely double tie the right hand ties behind the right ear and the left behind the left ear with the tie being near the top of the ear and adjust to fit. Then tighten the knot. Now you can slip the mask on and off without fussing with the knots. You also get a great individual fit to the face. I just discovered shoe laces and have not tried them yet. Stay tuned for version 6.0. They show great promise.
The craft wire is copper based with silver or gold plating. It is flexible enough to shape with your fingers to the nose and face, and the 18 gauge wire is strong enough to hold its shape, 20 gauge is hard to work with the bare hand. Pipe cleaners have been suggested, but they don’t want to hold their shape and twisting two together gets you a bulky thing to work with.
The sewing machine is good for speed, and it can all be done by machine It can all be done by hand too but you will want a large eye needle so you don’t spend all your time threading needles.
All the pliers are for shaping the ends of the wire so they are not poky, and don’t snag the fabric.
Construction
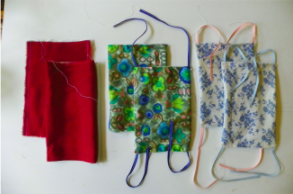
Since I am making so many I have broken down the process into 6 phases. I do about a dozen at a time depending on how the fabric works out. More than that and my spirit rebels against the factory like work. I do all dozen at each stage and then move on for efficiency. I have a picture of each phase for the visual help.
Phase 1
Cut out all the pieces of fabric, including the filters if you want them, and pin the long sides together with the right sides facing and the filter on the outside, so when you turn the piece inside out the filter is inside and the right side of the fabric is on the outside of the mask. Stitch the long sides. All the threads will end up on the inside so tying and cutting threads at this point is not needed.
Phase 2
Cut the ties. You will need 4 for each mask. I have abandoned the elastic concept. It hurts people after a while. The wide kind makes your ears stick out funny and the one size does not fit all comfortably. I have used ribbon with a knot in the loose end to stop fraying. The jury is still out on the washability of the ribbon, but you don’t have to sew the length on the ribbon. I prefer bias tape because it is so sturdy, even though you have to sew the length. You will need 4 10″ pieces per mask. If you have narrow (double fold) bias tape (1⁄2″) you are ready to sew them lengthwise as close to the open edge as you can. Slow down on this and be careful, any spot you miss will fuzz in the wash. You can leave the threads loose without tying or cutting. One end goes inside the mask, the other end will be tied and cut later. If you have wider bias tape (single fold) (1″), you will want to finger press it in half lengthwise and then sew. Ironing is not needed and would be a pain to do. You could sew the wide bias twice and not fold it, it will work, but it folds nice and I like the narrow ties better for tying.
Arrrrrgh – Shoe laces. I just found a package of colorful shoe laces in my craft stuff. They are designed for tying. They lay flat for sewing. They do not need to be sewn to be washable. Mine come 40″ so I can get a full matched set of ties from each one. Now I find it after 125 masks. Well, at least I found them. I am buying 36 pair for $25 from Amazon that are 47″ so I get 5 pieces from each so I get 90 masks with 36 colors of ties, but they cannot get them to me until the end of the month. I will get ready and do other stuff for a while.
Phase 3
Turn the pieces right side out putting the filter in between the other two layers. Open the seam on one side down about an inch and fold the seam down and inside the mask about a half inch. Hold that fold and work the seam at the other end of that opening in the same way. Pull the two folded seams away from each other to make the rest of the fabric fold down between your hands with the outside fabric toward you. Finger press the outside fabric across the piece. The inside fabric tends to ride up in the middle so push it down a bit there and finger press the inside fabric and the filter down and inside the mask. Place the inside and outside together and pin with two small pins near the center but leave a gap in the middle and in the two corners. Adjust the fabric so the outside fabric covers the inside fabric. If it does not fit at the corners make one corner cover. That will be the top of the mask and it will show, the other side will tuck under the chin and not be as visible. Tuck the loose threads into the mask.
Place one end of a tie inside the corner gap just over a half inch in. Tuck the loose threads inside the mask with the end of the tie. Line the tie up like it was an extension of the long side of the mask. Pin the tie in place. Put the second tie in the other corner.
Close the other end of the mask in the same way with the remaining two ties at the corners. This would be a good time to use a matching top thread if you have it. Stitch across the short sides of the mask with the outside fabric up. At the beginning and the end of the seam run the stitches forward then back, then forward again to strengthen the ties’ connection with the mask. Remove the pins as you go.
Tie off the thread with a double knot and trim the loose threads at the corners and at the end of the bias ties. Tie a knot in the loose end of any ribbon ties.
Phase 4
This would be another good place for matching top thread. At the narrow ends of the mask between the ties make three small pleats. They do not want to overlap each other so make them small. Pin them in place and run a single seam of stitches over the previous stitches to secure the pleats. Be careful to set the pleats in the other end so they line up with the first pleats and can lay flat and be ironed. I start the stitches with the edge where the top pleat is and then tackle the end where you are working against the pleats. On that side you need to work slowly and carefully to feed the pleats under the pressure foot.
Tie off the threads and trim them. Pull the mask from both end and tidy up the pleats so they lay flat the length of the mask. Iron the mask.
You now have a very functional, washable and durable face mask as good or better than most of the home made mask I am seeing on the street. If you want a nose wire to secure the mask over your nose and cheeks continue through phases 5 and 6.
Optional Nose wire
Phase 5
Find the top pleat, that is the top of the mask, then find the center of the long side of the top pleat by folding the mask in half with the outside fabric out, and finger press out any slack in the seam. Measure 1 3/4″ from the center and place a pin on each half of the front of the mask. Only pin one layer of fabric. Open the mask.
This would also be a good time for matching top thread. Sew a single line of stitches between the pins 3/8″ from the top of the mask to make the sleeve for the wire. Back stitching is optional, but a good idea.
Holding the loose threads back along the line of stitches, pinch the sleeve at the end of the stitches on the inside layer and cut one layer deep from the stitches to the top of the mask for an opening of the sleeve. Cut just outside the stitches so as not to cut the threads of the sleeve. Pull the outside thread to the inside of the mask and tie and trim the threads.
Phase 6
Cut one 4″ piece of 18 gauge craft wire (copper base with silver or gold or colored coating is what I have). It will be poky and can poke you and poke through the fabric, so round the ends. This can be done with any needle nose pliers by just folding the wire back on itself. It is better to make a loop to use as a handle for getting the wire in and out of the sleeve. A simple loop just twists the wire end down to touch itself using about 1⁄2” of wire for the loop. A fancy loop uses round tipped needle nose pliers. With round nosed needle nose pliers catch the end of the wire near the tip of the pliers and turn the end in a small loop back on itself using small twists of the wrist. With flat (not serrated) needle nose plyers grip the base of the loop from the inside and turn it back on itself to center the circle. Then lay the loop on your finger and press it closed with the flat plyers so it does not snag the cloth. With two flat needle nose pliers hold one loop in each hand and twist them until they are on the same plane and will fit nicely against your cheek in the mask.
Now the wire can be inserted into the sleeve and bent to fit the nose and face. Start in the middle at the bridge of the nose. The wire should be removed for washing.
This wire will fit any size nose and is adjusted each time to the wearer.
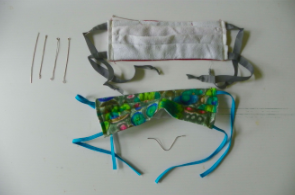
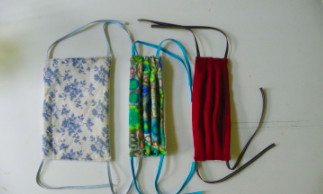
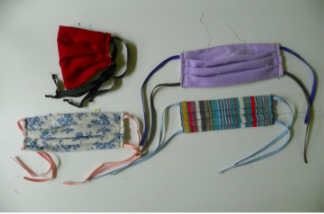
Evolution of a Mask
This picture shows the progression of masks as I figured our better stuff.
- Version 1.0 is small and has 2 wonky pleats going both ways. It is also hand stitch on the ends because I did not trust the machine to handle the thickness.
- Version 2.0 is bigger has three pleats and the pleats match but I tried the ties on the outside – bad idea.
- Version 3.0 is 2.0 cleaned up with the ties inside.
- Version 4.0 I figured out the nose wire thing
- Version 5.0 has blue filters inside
- Version 5.1 has white filters inside
- Version 6.0 abandons the filters and adds the shoe laces.

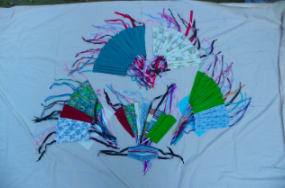
The last picture is of the 52 masks I will be delivering to the Baronial distribution site on Monday.
Final Notes
You get style points for matching thread and using interesting outside fabric. Don’t make too many flowery or pink ones; the ladies may not take them and the men will not. I like to give two to a customer so they have one to wash and one to wear. If they come to me for upgrades, they can pass the older versions on to someone who does not have masks yet. I have not been fussy about mistakes. I want to get these out fast and pulling out seams because the bobbin tension went wonky is not being done here, especially on the long thin bias tape. If it is functional it passes my test, move along.
The formal distribution center for health care workers in Lexington VA where I live does not need more masks. All the institutions have enough now and there are still few Corona virus cases here. The populace however is still about 75% maskless. We need informal distribution centers to get the masks to the populace. Pass them to neighbors, family and friends. Then pass them to workers in the stores and random strangers if you have more. I will keep making masks until I cannot find folks to take them.
The shoe laces work great and save lots of time. Happy Masking!
Be safe, Be well,
Rita Jane Kiefert
Also known as
Baroness Evelynne Merrymet
0 Comments